Pages

Thursday, September 8, 2011

Featuring Paint Me Plaid

LEAVE A COMMENT BELOW FOR A CHANCE TO WIN A SAMPLE ASSORTMENT OF MOD PODGE!  BRAVE GIRLS CAMP CALLS THIS SOUL GLUE. ITS AWESOME!

FUN AND FREE! LEAVE A COMMENT!

Have you heard of Plaid Crafts.  They sell craft acrylic paint including FolkArt, Apple Barrel and a new Martha Stewart line.  They also sell stencils, brushes and just about everything you need to make a beautiful painted project.  I know I own a LOT of Plaid products!!!  Plus, how could I ever get along without Mod Podge by Plaid?
Today we are featuring a tutorial to make a beautifully vibrant jewelry box.
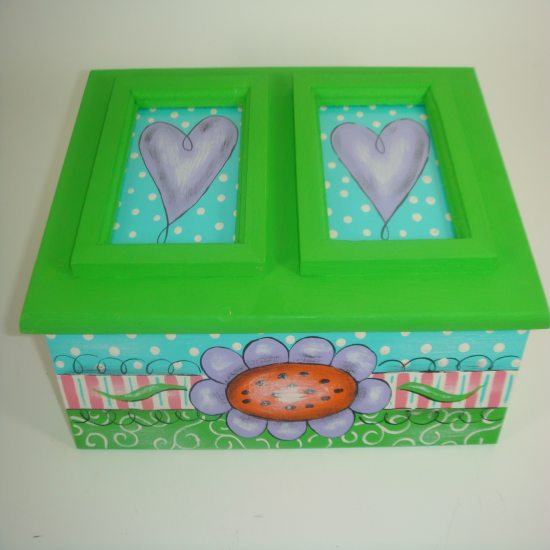
Here is a great last minute summer project you can create. Please feel free to switch up the FolkArt colors used, with other hues from us.  This adorable project was made by one of our talented designers, Sherrie Ragsdale. This is an intermediate skill level project, and will take anywhere between 1 hour to 1.5 hours to complete.
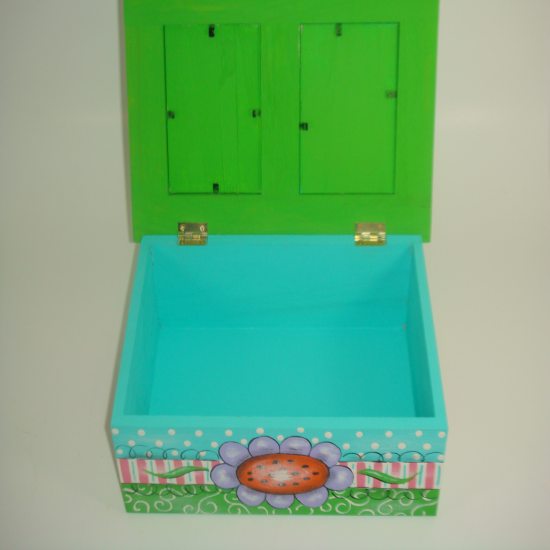
Supplies Needed:
FolkArt Acrylic Paints: 515 Vintage White, 413 Pink, 2553 Lime Green, 628 Pure Orange, 444 Patina, 516 Light Lavender, 938 Licorice
Plaid unfinished wooden box with double frames found at Walmart, Stencil Brush, Large Flat Brush, Medium Flat Brush, Small Flat Brush, Liner Brush, Masking Table, Tracing Paper, Pencil
Instructions:
1. Tape off the top and Bottom portion on box leaving an inch space in between and then paint the center vintage white.
2. Tape off the top portion of box and paint it patina and then tape off the bottom portion of box and paint lime green. Allow to dry.
3. Remove the top by unscrewing the hinges. Remove the glass from frames. Paint the top with lime green. Allow to dry. Paint the wooden frame inserts with patina.
4. Add the dots and swirls using the liner brush dipped in vintage white.
5. Add the pink stripe using the small flat brush. Allow to dry.
6. Trace the flower on all sides of box. Trace the heart on the frame inserts.
7. Paint the flower light lavender with an orange center. Paint the heart light lavender. Allow to dry. Outline in licorice and add black oval dots in the center of the flower.
8. Dry brush the flowers and the pink and vintage white center with licorice. Also the heart.
9. To dry brush the center stripe, tape off first

Wouldn’t this be perfect  in a little girls room?  I hope you enjoyed this tutorial.  Be on the lookout for some other fun crafts from Plaid!

Thursday, September 1, 2011

Who is Random Nicole?

aboutimageRandom Nicole is Nicole Stevenson started crafting things at an early age. Ahe started her first crafty business at age 9, selling handmade stationary out of an old refrigerator box (decorated to look like a shop) on her front lawn. she then moved on to to edible treats... creating and selling chocolates in front of her dad's barber shop.

Nicole now divides her time and creativity between:
1. creating and selling one of a kind things for her line: random Nicole
2. co-producing patchwork indie arts & crafts festival a bi-annual southern California event featuring emerging makers of art, clothing, food, music and more with her aunt Delilah Snell,
3. teaching DIY workshops and teaching crafts privately for everything from birthday parties to corporate team building
4. consulting and doing custom design work for individuals and businesses
5. writing short stories for her in progress MFA in creative writing


42
what you need:
-hand-sewing needle
-thread
-fabric scraps cut into various size circles around 2-5 inches in diameter
-necklace chain & clasp


what to do:

431. hold one fabric circle so the printed side is down

2. fold over about a 1/4 of an inch of the edge of fabric from bottom to top so you can see a bit of the printed side on the back of the fabric

3. thread your needle and do a running stitch (push the needle through the fabric from bottom to top then from top to bottom) repeat the running stitch around the circle

4. once you have sewn around the whole circle, pull the thread until your circle puckers (it will look like a pouch) and knot the tail of the thread from where you started with the tail of the thread with the needle on it.  knot it 2 more times

5. now pull the sides out from the center and flatten the pouch.

6. you have your first yo-yo!

7. repeat this for your other fabric circles until all the fabric circles are yo-yo's

8. design your necklace- pick 3 yo-yo's for the top line and arrange the rest below them in a 'v' pattern

9. once decided how to arrange your yo-yo's, slightly overlap the first two in the top left corner and sew a few stitches on the back side to connect them.

10. now sew the last one in the top row to the first two and sew the remaining yo-yo's together as well, making sure to overlap each one a bit.

11. stitch one end of each side of the chain to the top of each side of the 'v' of your yo-yo collage.

12. put your new necklace on and marvel at your craftiness!


Isn’t this great!!!  I see one of these in my future!!!


And how about this as the giveaway?

IMG_0400Nicole has generously offered to giveaway this cute owl bag!  Just leave a comment here for a chance to win!!!

After you leave a comment, be sure to browse Random Nicole’s website and then head on over to her shop!!!

Monday, August 29, 2011

Blumenthal Lansing giveaway!

Well aren't I a terrible tease....I somehow forgot to post the pic of the great giveaway from our featured tutorial last week.  Well here is the button-tastic giveaway!

WINNER IS KARIN HALL!!  HI KARIN! EMAIL US WITH YOUR SHIPPING ADDRESS. SO JEALOUS YOU WON THIS AWESOME PRIZE!!


I'm actually kind of sad to have been the blog writer on this tutorial because I looooove buttons!  This is a great giveaway.

For a chance to win, make sure to stop by the Featured Artist post and leave a comment.

Wednesday, August 24, 2011

Today's Featured Artist: Helen Slabodukh


We are so excited to bring a new "type" of tutorial to you this week.  We know that many of us (including our very own Elena) dabble in the super fun world of jewelry making.  Well, check out this super cute tutorial from Helen Slabodukh, Craft Project Coordinator for Blumenthal Lansing that combines paper-crafting and jewelry-making for a fabulous final result!


Button Charm Frame Pendant


I  was going through my box of jewelry components and for the longest time wanted to create a frame pendant  and now I have and I'm going to share with you the steps so that you to can create your own button charm frame pendant.  It's easy!


 MATERIALS: La Mode® #5125 - 2 buttons
                      La Mode® #49158 - 5 buttons
                      la petite #26 - 1 button


1 - Connector fame 3/4" x 1
4 - 4 mm jump rings
3 - 7 mm jump rings
Jewerly tools - flat nose & round nose pliers
wire cutter
rhinestone dangling earrings (16 pcs)
scrapbook papers; scissors
Epoxy 6000 glue  


I happen to have from my younger years a mismatched pair of rhinestone earrings  which of course came in handy such as today!  If you don't have a dangling pair - I'm sure there are many inexpensive pairs in jewelry shops...


With wire cutters - cut 16 rhinestone squares - trim if necessary.


Next - locate your glue - for this project I used Epoxy 6000 - now remember you will have to allow this to set for 24 hours before wearing. 


Before you begin make sure you have your 16 rhinestone squares - 8 for the top and 8 for the bottom.  Since these stones are small I relied on my flat nose pliers to help me.  


Run a small beam of glue along top - make sure to close the top of the tube it has a tendancy of being very potent!


Dont' worry you will have enough time to realign your stones if they seem a bit off!


Repeat the same procedure for the bottom.


If there are any loose threads of glue at this point pull them off.


One more step before you let this set dry. On my charm there happen to be a clear film strip so I opted to glue ontop my mini buttons:


With your Epoxy 6000 glue 4 buttons to acrylic film.  Remember 24 hours to have it dry.
                    **************************************************************
Next step - pick your background for your pendant.  Trace, cut and slide under acrylic slide.


So now you are about to add your button charms.  Locate all your jump rings.  Using your jewel tools split apart your jump rings. You will use your 4mm jump ring with the La Mode#49158 buttons.  Use 7mm jump rings with the La Mode #5125.


Attach jump ring to top bail, add your favorite chain and you're ready to wear.  Make sure all your jump rings are all aligned properly  - before you put away all your tool ( I see that I will have to go back and fix that jump ring!). 


So start creating your own button charm frame pendant.  We invite you to post your photos on our facebook page! If you have any questions, comments email me and I'd love to hear from you.

HAPPY CRAFTING!

Check back tomorrow for details on Helen's giveaway!

Tuesday, August 16, 2011

Jennifer Priest and The Hydrangea Hippo

Today we are featuring scrap booker extraordinaire and all around talented crafter, Jennifer Priest of  The Hydrangea Hippo.  Jennifer said to just grab a tutorial off her blog so I chose her tutorial on altering garage sale frames.

****************************

I bought some frames at a yard sale earlier this summer and finally got around to washing them off. I spray painted them black and then started decorating the insides. Here's the result:

Then I added paper to Chipboard to insert into the opening in each frame.

I added foam tape between layers of chipboard to make them thicker so I could tape the insert in place on the back of the frame. I could have used cardboard instead too.


And here is the final result, in my daughter Katie's room:


At some point I think I might add some ribbon roses or those rolled felt flowers but for now, I am happy with these simple graphic frames. The paper is Teresa Collins' Chic Bebe Girl Line, leftover from the Divaliscious albums kits I had sold in my etsy shop earlier this year. The K was cut with my Silhouette from SEI suede paper--I love the rich black it is!

***********************


Project 12x12 Class Kit -  Ribbon - 6 LayoutsJennifer would like to giveaway, to one of our lucky commenters, a 12x12 Project Class Ribbon kit.  This kit contains everything (plus) you need to make 6 12x12 layouts.

Jennifer’s project kits include detailed instruction sheets.  You can view all of her kits in her Hydrangea Hippo Etsy Shop

To qualify for the giveaway, comment below and “Like” the Hydrangea Hippo Facebook page.

Christmas in July Tutorial Winner!

Our very talented featured artist, Linda Auclair, is pleased to announce the winner of her Christmas in July tutorial.


Congratulations to Kim!

Please forward your contact information to Nubia at nubia@charitywings.org.  We'll pass along the information to Linda for you blog candy!

We also have five blog winners from the Lily Pad Cards tutorial that have yet to claim their prizes!

  1. LadyBird
  2. Lynette Evans
  3. Chris
  4. BreAnn
  5. H Barnes

Wednesday, August 10, 2011

My Memories Suite Digital Scrapbook Software plus a giveaway!!!

My Memories digital scrapbooking kits and scrapbook softwareA few weeks ago I was approached by Liz from My Memories about hosting a review and giveaway!  How great is that!!!
The software came with over 30 templates.  The one I chose to use, All About Funk, came with 5 pre-designed pages plus a number of fun embellishments and papers.
BestSoftware-420x170Use promo code MMS4Blog to receive a $10 discount.
I made a short album entitled “My Life in Photos.”  I wanted to put something together quickly so that I could show how easy this product is to use.  As soon as I got the product downloaded, I started the clock so I could see how easy the software is to learn and to use.  I was happily surprised.  From start to finish, this book only took two hours to complete!!!
I have virtually done no digital scrapbooking.  I have made a few layouts using Photoshop but was so overwhelmed that I was just happy when things looked good enough to put on the blogo and have never printed any of the layouts.
Here’s what I created with My Memories Suite!  Everything but the paper came with my initial download.
my life in photos-001The hardest thing about this project was finding my photos.  I use my Kodak software and Photoshop to upload photos and they both kind of hide them.  I’ve located them before but had forgotten where they were.  I gave up and definitely plan to find them soon and put them all in a better location.

my life in photos-002I used an album template and added a few elements and making other modifications along the way.  It’s so easy to add embellishments and text, and you can  add shadows behind the text and embellies with just a few easy clicks.

my life in photos-003With this page, I pretty much left everything as the were on the template, just adding the text and changing the photo mat sizes.  Now that I see it on the screen, I wish I would have added some ribbon or rick-rack at the bottom.  That would have only taken a few seconds and I will go back and add it later since it’s so easy.  (Our very own Elena took that top right photo.)

my life in photos-004Isn’t this page gorgeous?  Once again, I pretty much used the template as is.  I added the title, changed the photo mat sizes and moved the embellishments around.

my life in photos-005Last but not least,  an album wouldn’t be complete without pictures of my fur babies.  I’m in love with the paper as well as the stitching around edge.  The only thing I did with this page was to add the title.
Then, after you finish with your newly created scrapbook, you can order a photo book online!
I will definitely be using this often for my digital scrapbooking.  The company has a lot of beautiful Digital Kits (some are even free) on their website but there’s definitely enough included in the software to get you started.
Here’s a informational video from My Memories Suite.
My Memories Suite
Now, please comment below and you’ll be entered to win your own free copy of My Memories Suite!!!
Get10off-200x100If you like see and want start digital scrapbooking right away,  follow the above click on the  graphic above to go their website get your own copy. 
Just use promo code MMS4Blog to receive your $10 discount!!!

Thursday, August 4, 2011

Don't forget about the giveaways!

Don't forget to leave a comment in our new Christmas in July tutorial from Linda Auclair for a chance to win some blog candy!


Also, we are still waiting to hear from our winners from the Lily Pad Cards tutorial.  Email your contact information to Nubia at nubia@charitywings.org so that you can receive information on how to redeem your prize.  Here are the five winners from that tutorial:

  1. LadyBird
  2. Lynette Evans
  3. Chris
  4. BreAnn
  5. H Barnes