Pages

Friday, April 29, 2011

Today’s Featured Artist is our Very Own Nubia Chaidez

 
Before I get to todays tutorial, I want to remind you that you can still purchase tickets for the raffle for the Japan Relief fund.  Click here to see the details and buy one or several tickets!!!
***************************
We wanted to feature our very own blog writer, Nubia, with her Cinco De Mayo tamale tutorial.  Now, I’ll just turn it over to Nubia.
 
As a Mexican-American, I find it pretty funny that people in the United States will not only celebrate a Mexican holiday but also give it new meaning.  Cinco de Mayo does not equal Drinko de Mayo.  Now, don't get me wrong, I like a good meal with cocktails, but the Cinco de Mayo holiday is rarely celebrated in Mexico (as it relates specifically to the people from the state of Puebla).

Cinco de Mayo commemorates the Mexican army's unlikely victory over the French in 1862.  It is not Mexican Independence Day (that's in September).

Anyway, I wanted to post a more positive Latino project that you can choose to make on Cinco de Mayo to honor the people of Mexico.  This tutorial is something I had created for an on-line magazine called Latin Webzine but they had some difficulty in moving forward with the piece, so I'll share it here. It's a fun way to create an embellishment to add to layouts that capture a huge family tradition - making tamales.

Step 1:
Use a paper scorer to score vertical lines on the tan colored cardstock.

I have recently discovered the Martha Stewart scoring board – it’s a favorite new tool. If you’re going to invest in a scorer, I highly recommend you invest in this one. It comes with a guide for how to make to envelopes and paper boxes. It also allows you to score every 1/8 inch versus every ¼ inch.

A scoring tool is used to create creases in paper. It’s normally used to help make a clean crease to make a card. I, however, am using it here to create the lines of the corn husk.

So I scored the paper at every 1/8 inch. - the entire sheet. It really doesn’t take that long (I promise).


If you aren’t ready to invest in a scoring board, you can also fold the cardstock on your own by using the edge of a ruler to make the crease cleaner. It will be harder to make small creases, but the overall look should be about the same.

Step 2:
Using a blending tool with a foam attachment, I inked the foam pad with the Jim Holtz Antique Linen distress ink. I heavily inked the pad and then blotted some off on a tissue so that it didn’t go on too heavy to the paper at first touch.

I then lightly stroked the blending tool across the tan colored cardstock on the side with the raised ridges created by the scorer. I first followed the “grain” of the paper just to add a little color to the overall sheet. Don’t be afraid if the color doesn’t go on evenly because it will look more like a real corn husk if it doesn’t. Real corn husks have various coloring throughout – so just blend away.

I followed up by another light blending against the “grain” which allowed for more color to go on the ridges.


If you don’t want to buy a blending tool, I would try using a make-up foam applicator to achieve the same effect. A cotton ball might work, but the ink won’t be as evenly distributed among the cotton fibers so it might be tougher.

Step 3:
Once the entire sheet has been inked, I used the scorer to create a perpendicular crease.


Step 4:
Depending on where you will use your paper tamale, cut a small section of the full sheet off. For my project, I used about a 3 inch wide strip.


Step 5:
Fold in about ½ an inch of each vertical side.
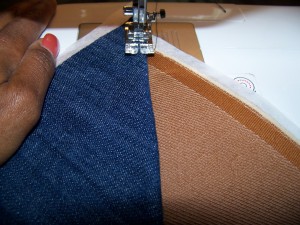

Step 6:
Use scissors to cut that ½ inch section along the perpendicular crease. Only cut that half inch on each side.


Step 7:
Some members of my family make flat tamales while others make pouch looking tamales. For a scrapbook embellishment, I thought the pouch would be more intriguing texture wise. However, if you want to keep the page as a flat as possible you can fold up the paper in half and glue the edge to the back. It’s like creating a pocket.

To make the pouch-like tamale, you’ll have to first lightly spray the inside of your tamale (the non-inked side) with water. Moistening paper makes it easier to fold into a pouch-like shape. Trying this while the paper is dry will be difficult and the paper may rip.


If you don’t have a spray bottle, you can try using a wet paper towel to blot the cardstock. The spray bottle helps to evenly mist the paper, but you can try other ways. The trick is to not soak the paper but to make it damp.

Step 8:
Once the paper is damp, place a few cotton balls in the inside to create the stuffing. Depending on the size of the paper you cut out, you’ll need more a less than I show here.


Step 9:
I then folded in the top two ½ inch edges and folded up the paper to create a pocket. I gathered the top and tied with a ribbon. I glued the ½ inched edges to the back and trimmed anything peeking out at the bottom of the tamale to smooth out the bottom edge.


Finished product:
So your two final potential styles of paper tamales will look like this!


I used my pouch-like paper tamale to create a 12 x 12 inch scrapbook page of making tamales with my mom. Depending on the size of paper tamales you make, you can use them on cards to invite folks to a tamalada, as decorations for an office Christmas party, or as part of way to remember a fun-filled day with friends and family.

Thursday, April 21, 2011

Today's Featured Artist: Nadia Herbst-McConnell!!

If you've ever honored me with a visit to my own personal blog, then you know that I am obsessed with two things: 1) finding ways to express ethnic heritage visually and 2) using my Cricut Expression! I'm so obsessed with my Cricut, that I became a Cricut Circle Member.  This has allowed me to see the work of some very talented members through various challenges.

Today's tutorial was quite eye catching when I saw it in the weekly challenge about flowers.  I thought it was a great tutorial to share for anyone celebrating Easter, but this could easily turn into a fun gift for Mother's Day, for a special little girl in your life, for a flower girl at a wedding...oh there are sooo many possibilities for this adorable project!

I'll stop raving and let Nadia's work speak for itself!  You can see more of her creations at her blog, With Glitter Eyes.

Paper Flowers!

This weekend, I worked on three challenge projects that go together.  I wanted to make a special gift for a friend who has helped me this past year.
The card, tag, and basket are challenge projects I have created to match!
The Circle Blog's Weekly Challenge #29: Handmade Flower Challenge piqued my interest because I love making dimensional flowers.  I have played a bit with Mother's Day Bouquet and decided that it would be fun to cover an object with flowers.  I have some leftover metal buckets from Christmas that I purchased for $1 at Target.

I cut TONS of flowers using that cart and flood filling them with colors from Nursery Tails.  After I made a few test cuts, I decided on several that I liked best.
I was so glad I had this chart once I decided to make additional flowers for a card and tag!

I inked, glittered, and added pearls to accent them.
I used a chunkier glitter than I normally use and really liked the results. 
I used E6000 plastic adhesive to ensure that the flowers would not pop off of the metal can.  I started crowding the flowers together and went back to fill any with additional small flowers at the end, covering the bucket completely and hiding the polka dots.  The gluing process took quite longer than I expected because  I had allow time for the glue to dry before being able to roll the bucket to a new section.  Patience definitely pays off on a project like this!

I really liked the way it finished!  When  I read Allison's Weekend Challenge on the MB and saw her fantastic card sketch, I knew I wanted a matching card!
Allison created this sketch!!!  I have to learn to do that.

I started with the cross on Easter 2010.  I cut it at 2.9" with the shadow.  I used matching flowers to decorate the cross.
I printed pink and green cardstock using the same colors from Nursery Tails that I had floodfilled on my flowers to use for the card base and mat.  The base was cut at 12" wide by 8" tall and then scored to finish folded at 6" x 8".  The mat was cut at 5.5" by 7.5".  I used my Zutter 1/2" Corner Chomper to round the edges of the base and mat.  I used a Martha Stewart edge punch to decorate a paper ribbon, applying with double-sided tape.  I printed the sentiment on my computer using Microsoft's Chopin Script at 20 point, using the darkest green under 'theme colors'.  The cross was popped up with foam dots.
Doxie's Sunday Challenge gave me a little incentive to continue on my theme to create a tag for my basket and submit an entry for her Shape Challenge: Ovals.  Using the scalloped and smooth egg shapes on Easter 2010, I cut them at 1.8.  The colors were also from Nursery Tails.  I cut another cross from the same cart, just like the one I cut for the card, but this one was 2".  More flowers and pop dots to add depth to the tag and I ended with this.
I think the basket is really enhanced by the tag.  It really adds to it.  I love it when things work out that way!
I was so pleased with this set.  I will be filling the bucket with cake bonbons to present to my friend after the Easter Vigil next weekend.

Today is Palm Sunday.  As we lead up to Holy Week, I wanted to be free for the extra services and events and am thankful to the challenge ladies for prompting me to do this project now!

Thursday, April 14, 2011

Spring Showers Mixed Media Collage

mflaum_canvas_peekI have such a treat for you today!!!  The very talented May Flaum has a tutorial for us to share. 

imgHere’s what May says about herself on her blog.

“Who am I? I'm just me. A mom of 2 girls and the wife of a firefighter who likes to jump into things with both feet. I'm a purple, vintage, damask, and happily ever after book loving kind of girl.

As far as my artistic life, I don't believe in a lot of rules or regulations. I teach classes, I've written a book, and done a lot of designing for a number of companies. I've enjoyed every minute and I look forward to where I'll head next in the scrapbook industry... “

Now, you’re probably wondering what May is sharing with us, huh?

mflaum_canvas1This beautiful mixed media collage.  In the video, she shows techniques and procedures that she uses for her collage.

Mary is on the design team for Scarlet Lime and the tutorial is on the Scarlet Lime blog.  Head on over there to learn how May made this collage!!!


AmeriCares_logoOne other thing, do you live in the San Diego area?  We have some tickets for the Del Mar Scrapbook Expo.  All you need to do to get one is donate $5.00 to the AmeriCares Japan Relief Fund.  The tickets normally sell for $7.00 so not only do you help the people in need but you also save $2.00!!!  Click here for more information and to donate. 

Thursday, April 7, 2011

Today's Get Featured Artist is "Sew Frugal & Fashionable"

I decided to change things up a bit this week, and post a little something for our sewing crafty readers!  Sew Frugal & Fashionable is a relatively new blog dedicated to challenging its readers to shop smart by not traditionally shopping AT ALL

Based in DC, Sew Frugal & Fashionable teaches its readers how to:
  • participate in clothing swaps
  • how to shop for quality clothing at goodwills and swaps
  • how to use sewing skills to create something fashionable
One of their most recent tutorials showed readers how to sew a quick weekend bag.  Looks pretty simple to do....who's gonna go for it?!  Send us a picture so we can see!

~~~~~~~~~~~~~~~~~~~~~~~~~~~~~~~~~~~~~~~~~~


Last weekend I decided to take on three bag projects. Unfortunately with all the thrift store visiting I was only able to get around to one bag.  In our upcoming sewing class in May attendees will have the option of completing one of three bags. This will be one of them.

To begin you will need to think about what you want to use your bag for. Are you trying to match with another piece of clothing?  Are you going for utility? Do you want large or small? Perhaps you are using scraps of fabric and other add-ons to make more interesting. The choice is yours, just be sure to think it through before you get started. Remember at some point you will need to sew through all thickness therefore be sure to choose your fabric wisely. Below you will find illustrated step by step directions for creating this bag. Should take about 2-3 hours from start to finish if you are a novice.
Happy sewing :-)

start off with 4 squares (ex 18x18)

Fold all four squares in half to create triangles

Insert a piece of interfacing for stability

Place the triangles on top of each other alternating colors

Top stitch down the center to connect the triangles


Place the sewn pieces on top of one another

Stitch through all thickness. Do not pivot at corners. Instead sew all the way to the end of the fabric and back stitch
Place corners together to create a triangle on the corner
Stitch across the bottom to create the squared bottom
Turn inside out
Your bag should look something like this
Take note of the corners. Use and iron to press seams flat


Feel free to add a snap, button hole or any other embellishments
Now for the shoulder straps. Feel free to use pre-made straps to save time
Stitch pieces together
turn inside out

Create the casing by folding the corners down
feed the strap through the casing and adjust the length

Finished Product

We can help the people of Japan

If you haven't heard the news today, Japan was once again hit by a large earthquake.  There was a tsunami warning initially, but thankfully that has since been lifted.

I know many of us feel helpless and don't quite know how to help best.  As with many large disasters globally, financing relief and rescue efforts is a huge priority for the country.  So, I wanted to make sure everyone knew that Charity Wings has two ways that you can donate (and maybe win a little crafting prize in return).

~~~~~~~~~~~~~~~~~~~~~~~~~~~~~~~~~~~~~~~~~~~~~~~~~

Artists and crafters unite
help the victims of the devastating earthquake and tsunami in Japan with a online progressive raffle!
PDF Print E-mail
Some staggering statistics:
  • Current death toll is 18,400(10,500 in Miyagi prefecture alone)
  • 452,000 people living in shelters
  • Radiation leaks from stricken nuclear reactors continue to spread through the region's food supply.
  • The World Bank said that it could take Japan five years, and a cost between $100billion-$200 billion to overcome the catastrophe.

The toll on human lives and the economy is overwhelming. Charity Wings has an opportunity for you to help...

You can win several awesome prizes.  MORE PRIZES COMING!!  I will be posting them as I get confimation.
Each day starting Aug 30th. I will pick a winner.  The winner will get to choose their prize! We will pick a new winner each day till all the prizes are chosen. Need not be present to win!!!
Kolleen Harrison of Heart Wing Sisters
kolleen harrison
Christine Nay from Change of Heart Creations
she art girl 1
kat
We are accepting donations of prizes as well. Email us with an image of your
handmade art or supply donation!

Tickets are $5 each
Buy 4 tickets for $20 and we will assign you 2 free bonus raffle numbers!!

We are raising money for AmeriCares
AmeriCares_logo

This organization is designating 100% of the funds donated to the relief efforts in Japan.
Buy your tickets today!  We are drawing the first winner on April 30th National Scrapbook Day!
At the Scrapbook Expo in Del Mar California.  Join the fun!

We will assign the 2 extra ticket numbers for every 4 tickets you buy.

~~~~~~~~~~~~~~~~~~~~~~~~~~~~~~~~~~~~~~~~~~
Artists and crafters unite
drawing to be held May 9th
help the victims of the devastating earthquake and tsunami in Japan and get bonus chances to win the $900 value basket from scrapbook dimensions and 8 awesome sponsors!
To win you must answer the questions on
the Scrapbook Dimensions Website
then donate here to get additonal chances!

PDF Print E-mail
  Basket Sponsors:

  • ScraPerfect
  • Rubber Stamp Concepts
  • Earth Safe Finishes
  • Robin’s Nest
  • Crafter’s Workshop
  • Makin’s Clay
  • Majenta
  • Brooke International
  • Bennie Morgan Ltd.
  • Westcott Brand
Basket1
for every $10 you donate you will get an additional entry to win the basket above~
Some staggering statistics:
  • Current death toll is 18,400(10,500 in Miyagi prefecture alone)
  • 452,000 people living in shelters
  • Radiation leaks from stricken nuclear reactors continue to spread through the region's food supply.
  • The World Bank said that it could take Japan five years, and a cost between $100billion-$200 billion to overcome the catastrophe.

The toll on human lives and the economy is overwhelming. Charity Wings has an opportunity for you to help...

You can win this great basket or you can also help by buying raffle tickets for our Handmade Raffle that will be drawing starting April 30, 2011. Just in time for National Scrapbook Day!. 


We are raising money for AmeriCares
AmeriCares_logo

This organization is designating 100% of the funds donated to the relief efforts in Japan.
Buy your tickets today!  We are drawing the first winner on April 30th National Scrapbook Day!
At the Scrapbook Expo in Del Mar California.  Join the fun!