Pages

Showing posts with label tutorial. Show all posts

Thursday, September 8, 2011

Featuring Paint Me Plaid

LEAVE A COMMENT BELOW FOR A CHANCE TO WIN A SAMPLE ASSORTMENT OF MOD PODGE!  BRAVE GIRLS CAMP CALLS THIS SOUL GLUE. ITS AWESOME!

FUN AND FREE! LEAVE A COMMENT!

Have you heard of Plaid Crafts.  They sell craft acrylic paint including FolkArt, Apple Barrel and a new Martha Stewart line.  They also sell stencils, brushes and just about everything you need to make a beautiful painted project.  I know I own a LOT of Plaid products!!!  Plus, how could I ever get along without Mod Podge by Plaid?
Today we are featuring a tutorial to make a beautifully vibrant jewelry box.
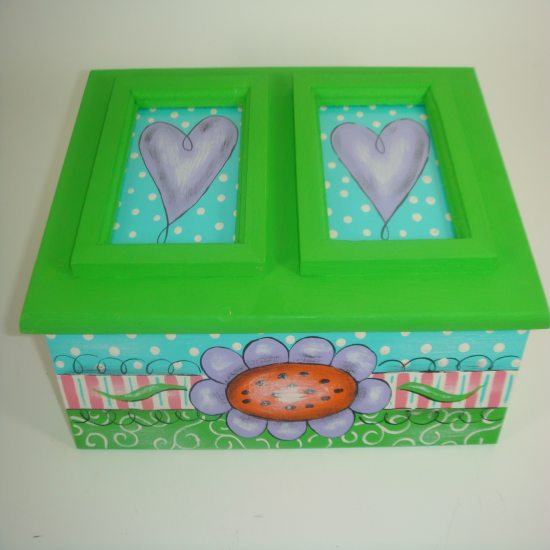
Here is a great last minute summer project you can create. Please feel free to switch up the FolkArt colors used, with other hues from us.  This adorable project was made by one of our talented designers, Sherrie Ragsdale. This is an intermediate skill level project, and will take anywhere between 1 hour to 1.5 hours to complete.
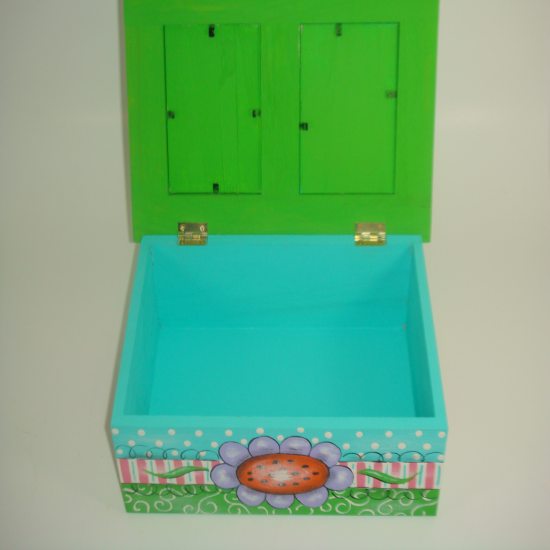
Supplies Needed:
FolkArt Acrylic Paints: 515 Vintage White, 413 Pink, 2553 Lime Green, 628 Pure Orange, 444 Patina, 516 Light Lavender, 938 Licorice
Plaid unfinished wooden box with double frames found at Walmart, Stencil Brush, Large Flat Brush, Medium Flat Brush, Small Flat Brush, Liner Brush, Masking Table, Tracing Paper, Pencil
Instructions:
1. Tape off the top and Bottom portion on box leaving an inch space in between and then paint the center vintage white.
2. Tape off the top portion of box and paint it patina and then tape off the bottom portion of box and paint lime green. Allow to dry.
3. Remove the top by unscrewing the hinges. Remove the glass from frames. Paint the top with lime green. Allow to dry. Paint the wooden frame inserts with patina.
4. Add the dots and swirls using the liner brush dipped in vintage white.
5. Add the pink stripe using the small flat brush. Allow to dry.
6. Trace the flower on all sides of box. Trace the heart on the frame inserts.
7. Paint the flower light lavender with an orange center. Paint the heart light lavender. Allow to dry. Outline in licorice and add black oval dots in the center of the flower.
8. Dry brush the flowers and the pink and vintage white center with licorice. Also the heart.
9. To dry brush the center stripe, tape off first

Wouldn’t this be perfect  in a little girls room?  I hope you enjoyed this tutorial.  Be on the lookout for some other fun crafts from Plaid!

Thursday, September 1, 2011

Who is Random Nicole?

aboutimageRandom Nicole is Nicole Stevenson started crafting things at an early age. Ahe started her first crafty business at age 9, selling handmade stationary out of an old refrigerator box (decorated to look like a shop) on her front lawn. she then moved on to to edible treats... creating and selling chocolates in front of her dad's barber shop.

Nicole now divides her time and creativity between:
1. creating and selling one of a kind things for her line: random Nicole
2. co-producing patchwork indie arts & crafts festival a bi-annual southern California event featuring emerging makers of art, clothing, food, music and more with her aunt Delilah Snell,
3. teaching DIY workshops and teaching crafts privately for everything from birthday parties to corporate team building
4. consulting and doing custom design work for individuals and businesses
5. writing short stories for her in progress MFA in creative writing


42
what you need:
-hand-sewing needle
-thread
-fabric scraps cut into various size circles around 2-5 inches in diameter
-necklace chain & clasp


what to do:

431. hold one fabric circle so the printed side is down

2. fold over about a 1/4 of an inch of the edge of fabric from bottom to top so you can see a bit of the printed side on the back of the fabric

3. thread your needle and do a running stitch (push the needle through the fabric from bottom to top then from top to bottom) repeat the running stitch around the circle

4. once you have sewn around the whole circle, pull the thread until your circle puckers (it will look like a pouch) and knot the tail of the thread from where you started with the tail of the thread with the needle on it.  knot it 2 more times

5. now pull the sides out from the center and flatten the pouch.

6. you have your first yo-yo!

7. repeat this for your other fabric circles until all the fabric circles are yo-yo's

8. design your necklace- pick 3 yo-yo's for the top line and arrange the rest below them in a 'v' pattern

9. once decided how to arrange your yo-yo's, slightly overlap the first two in the top left corner and sew a few stitches on the back side to connect them.

10. now sew the last one in the top row to the first two and sew the remaining yo-yo's together as well, making sure to overlap each one a bit.

11. stitch one end of each side of the chain to the top of each side of the 'v' of your yo-yo collage.

12. put your new necklace on and marvel at your craftiness!


Isn’t this great!!!  I see one of these in my future!!!


And how about this as the giveaway?

IMG_0400Nicole has generously offered to giveaway this cute owl bag!  Just leave a comment here for a chance to win!!!

After you leave a comment, be sure to browse Random Nicole’s website and then head on over to her shop!!!

Tuesday, August 16, 2011

Jennifer Priest and The Hydrangea Hippo

Today we are featuring scrap booker extraordinaire and all around talented crafter, Jennifer Priest of  The Hydrangea Hippo.  Jennifer said to just grab a tutorial off her blog so I chose her tutorial on altering garage sale frames.

****************************

I bought some frames at a yard sale earlier this summer and finally got around to washing them off. I spray painted them black and then started decorating the insides. Here's the result:

Then I added paper to Chipboard to insert into the opening in each frame.

I added foam tape between layers of chipboard to make them thicker so I could tape the insert in place on the back of the frame. I could have used cardboard instead too.


And here is the final result, in my daughter Katie's room:


At some point I think I might add some ribbon roses or those rolled felt flowers but for now, I am happy with these simple graphic frames. The paper is Teresa Collins' Chic Bebe Girl Line, leftover from the Divaliscious albums kits I had sold in my etsy shop earlier this year. The K was cut with my Silhouette from SEI suede paper--I love the rich black it is!

***********************


Project 12x12 Class Kit -  Ribbon - 6 LayoutsJennifer would like to giveaway, to one of our lucky commenters, a 12x12 Project Class Ribbon kit.  This kit contains everything (plus) you need to make 6 12x12 layouts.

Jennifer’s project kits include detailed instruction sheets.  You can view all of her kits in her Hydrangea Hippo Etsy Shop

To qualify for the giveaway, comment below and “Like” the Hydrangea Hippo Facebook page.

Thursday, June 30, 2011

Create a Washtub Herb Garden with Jen Osborn

During my time working with Charity Wings I have met (virtually)some pretty awesome and talented women and today I will be featuring one of those ladies.
Jen Osborn is a third generation artist and freelance writer who lives in rural Michigan with her family. She has an enormous imagination and loves nothing more than opening other people’s eyes to what lies inside her mind by creating artwork that’s as fun to touch as it is to look at! She has a knack for blending quirky vintage photographs with modern techniques which lets you experience a burst of colorful eye candy. She stitches together fabric and paper to create tiny story quilts which tease your eyes and tickle your heart.
61xYhb2QzIL__BO2,204,203,200_PIsitb-sticker-arrow-click,TopRight,35,-76_AA300_SH20_OU01_Jen currently has a book out called Mixed and Stitched: Fabric Inspiration & How-To's for the Mixed Media Artist.  She also has an Etsy shop where she sells some of her handmade items as well as hand drawn embroidery patterns. and check out her blog The Messy Nest for other fun ideas and inspiration.
Now, in Jen’s own words.
Washtub Herb Garden
Planter7
On Mother's Day I decided to plant some grape tomatoes and an herb garden in an old two-sided washtub I found at a local antique store. This is what is looks like 2 weeks later after buckets of rain, and lots of pep talks. I've already started to nibble on the arugula, but I'm really excited about the tomatoes. I left my washtub battered and rusty, but you could easily buy some outdoor furniture paint and spruce it up even more. {how fabulous would it look like with polka dots or flowers or birds painted all over it!} I've gone and planted herbs in mine, but I think it would make a fabulous strawberry grower or a beautiful deck flower planter too! Your imagination, and the garden center are your only limitations. Here's how easy it is:
SUPPLIES:
  • double-sided washtub or something similar
  • 2 large bags potting soil
  • 8 - 12 herbs / plants / flowers
  • lots of sun & water
step 1:
Planter1 If your washtub/container doesn't have a drain in the bottom you want to create one in each side so you don't drown your plants. You can either use a drill to make them or simply a hammer & nail to make about 5 holes in the middle of each side if it slopes or randomly around the bottom if your washtub has a flat bottom. Next, buy two big bags of potting soil, and pour one in each side of your washtub. If you only have one big basin you just need to put both bags in. If you want to cut down on cost you could fill the bottom half with fill dirt and rocks, but then you're looking at needing to fertilize. If you buy potting soil, that's usually mixed in and you can just plant and grow.
step 2:
Planter3 Dig a softball size hole for each herb you want to plant. You want to give each plant enough room to grow so don't crowd them all together. The plant spike should tell you how far it needs to be from another plant, but I find about 4 to 6 inches is good. I like to use garden gloves so my fingernails don't get all grimy, but they are certainly not necessary if you don't already have a pair. You could use a trowel if you like too, but I find it easier to just dig them with my own two hands. The idea here is to keep cost down as much as possible, but still keep it capable of producing a nice harvest.
step 3:
Planter4 I only did herbs in half because I wanted to try growing grape tomatoes to snack on in the other side. Last year I grew one to make sure they were tasty, and this year I have 4 going in the right half of my washtub garden. Just turn your plant upside down, and give it a little shake or wiggle to free it from the plastic container they come in. You want to break off about 1/4 of the rootball from the bottom to encourage growth, and then drop them into the holes you made in the soil. Push the soil in around your plant, and gently push down all the way around the stem making sure it's packed lightly so your plant won't fall over. You don't want to pack it in firm though or you risk injuring your plant.
step 4:
Planter5
Continue on till both sides of your planter are filled and planted. In this side I planted:
top row - garlic & cilantro (not in the planter yet for this pic)
middle row - horseradish & basil
bottom row - arugula (yuhummy!)
The garlic and horseradish won't be ready until fall, but I love them both so they're worth the wait. Make sure you keep the plant info spikes that came with your herbs so you know what kind of care they need, and when you can harvest them. Most herbs need full sun to thrive so don't worry about needing a shady spot ... you can stick them right out in the sunniest spots, just remember to water regularly!
step 5:
Planter6B After you've planted everything, you need to give it a BIG drink of water. The potting soil comes a little moist, but it dries out really quick in the sun so don't forget this step! Now all you have to do is sit back and watch your herb garden grow. As you can see from my rainy picture up top, it doesn't take very long for it to flourish. After two weeks of on and off rain, mine is growing like gangbusters! Don't forget to go out and talk to them too ... everybody needs a little encouragement to grow :)
So, that's it ... lickety split! Took me about a 1/2 hour from start to finish and cost under $50 including the planter, soil, and plants.
NOW GO MAKE ART!
{or plant somethin'}
:)

Thursday, June 16, 2011

Featured Artist-Paper Weaving Tutorial and GIVEAWAY!

I’m on the Design Team for a store called McMahon Five Designs.  I’m sharing a tutorial by my friend Sue, the owner of the store.

Real Wood Paper Weaving Tutorial
By Sue McMahon, McMahon Five Design
Description: https://blogger.googleusercontent.com/img/b/R29vZ2xl/AVvXsEjHhmgykkTOcgyV8-1kuUJhDQlO3mKFtwC-LVLBbSvDcu7F1-qW8fcOMcEH_3dWD0ZEz6O63rasr35PLoOTnfi-w09VlSiCP5KQe6YOGyA1XnFlD_TWhpkgIl_gWqj9kGlttyDFRrKI52QL/s400/M5D_paperweaving_1.jpgI started off with a piece scrap printer paper and applied a  horizontal strip of removable adhesive near the top/middle of the paper. I used this to hold the strips still while I was weaving.
The strips of real wood paper are ½” wide and the length varied as they are scrap pieces. I chose to work with 2 species: Cherry and Walnut. I laid the top section of the first piece of walnut vertically across the horizontal strip of adhesive. Then alternated laying down the Cherry and Walnut wood pieces.
I then used a piece of Walnut and wove it horizontally through the vertical strips. I slid it up as high as it would go. I next used a piece of Cherry and wove it over/under the opposite piece I wove over/under with the previous Walnut piece. I slid the Cherry piece up as close to the walnut piece. I repeated until the full length was woven.
Description: https://blogger.googleusercontent.com/img/b/R29vZ2xl/AVvXsEhODP7ZqXrHzQgL4FK0IpcUh53_n1qv0plbmyLtmK38c4_IYBqOISgay0qQ0W19K35f_G4Mk-m6xjE8JkEYWvqemddSjWDQLfwqGvA3Q8E7DKxpR2F-sGGTxsXHpwkvH-AjCjOS4xkUBDnI/s400/M5D_paperweaving_2.jpgOnce it was completely woven, I removed it from the white piece of paper and flipped it over. I secured the edges on the underside with Glue Dots.
Description: https://blogger.googleusercontent.com/img/b/R29vZ2xl/AVvXsEgV_Px_B_jC1TJDJoqlvD1nMZbndizKAdpfjvt54CuRjSt2wnKnh2p4juQqSe6MzDgJXU5KQ5hkgQKG4uxqZuWwTt1kcWb8DL8SJKPKRRdrRCTlhB1klJSjLUkdM7fAgZONe_a5lz3EDLJf/s400/M5D_paperweaving_3.jpgOnce it was secure, I trimmed off the uneven edges. On this particular one, I did plan it out so the edges all were framed with the long strips being Walnut.
Description: https://blogger.googleusercontent.com/img/b/R29vZ2xl/AVvXsEgp1t3oKbBHfLt9o4kdIgqFugUNNKyRjRFFY7hDM57v18jdxj-8HlMDfPKZKifHZE25SCr0RXwiUU63dpGGPhufJeOzfVYfPFKIyyNTyKui6Zxa9GLbD3ZOBeRzndg07zHTd9U1uHw8UdYJ/s400/M5D_paperweaving_4.jpgBecause I chose to use Real Wood Paper over cardstock or designer paper, the final results offer more dimension and texture in the project. That coupled with Earth Day, makes a GREEN/Earth Friendly project as well.
Description: https://blogger.googleusercontent.com/img/b/R29vZ2xl/AVvXsEgVtKoBxQoSUdrSYjDFXoOfZSJT0QHho97ytkGpWxVqJ9EXvdNnl9pnkQgGoOTmf7QQqQerjajqiYo9lj5VrzX0-XW2tniGtKDuTqhQhXdNpsVen2Ch-Z6NbhJYrqPgkGyOsaJRmVT6LeyQ/s400/M5D_realwoodpaper_sue1.jpgThis is the Real Wood Paper woven piece placed on a folded piece of Cherry 2-Sided paper.
Description: https://blogger.googleusercontent.com/img/b/R29vZ2xl/AVvXsEgq6fBOM_CPnf5z81qIenZVPOXi-PePlloXcGXt91843EAdz9A1ZKs0CJcNEnpWjf4CQ4CAxMBV0LhyuaovnTFYPzwOqEZOVix0ufhDK6ZiPf0t2mHz7Ha0kMPPxGxJ-RfvUr3WrIlsbX22/s400/M5D_realwoodpaper4.jpgThis is another sample of Real Wood Paper weaving where I chose random strips with no pattern in mind. I then used a heart stencil to trace the shape onto the weaving piece and cut out the heart shape.
Wood Paper Weaving Kits are available in the McMahon Five Designs store.
m5d_$10couponSue has graciously offered to giveaway a gift certificate to the shop in case you want to get some real wood paper of your own.  Or, you can get anything you want from the store!

Friday, May 13, 2011

Brown Paper Packages with Julie Fei-Fan Balzer

I feel so luck to have gotten Julie Fei-Fan Balzer for this Friday’s tutorial.  If you haven’t heard of Julie, go check out her blog/website (click on her name above).  I love the boldness of color of her art pieces but her doodling blows me away!!!

StripOfMe

I’ve taken this from bio from Julie’s blog.

Hello! My name is Julie Fei-Fan Balzer and I am a mixed-media artist living in New York City.

I tend to focus integrating my every day life into everything I do. I love art that looks handmade - lots of tearing and inking and handwriting and hand cutting. I'm also a technique and tool junkie, always trying to find a way to push my supplies further and see all the possibilities.

I'm a general craft-a-holic. I've dabbled in everything from polymer clay to cross stitch to paper making. But the great crafty loves of mine are scrapbooking, art quilts and jewelry. And I like to combine all three of my favorite methods of expression into mixed media creations!”

Read more: http://balzerdesigns.typepad.com/balzer_designs/about-me-julie-feifan-balzer.html#ixzz1MCo49WEX

Julie wanted to share the following tutorial with you.  While it was originally written for the holidays, it could certainly be used for anytime of the year!!!

One of the things about the holidays is that there's lots of cooking and baking going on.  At our house that means paper bags.

Paperbags
We are going to transform those bags into funky home made wrapping paper!  I've got three different decorating ideas for you, but the prep is the same every time.

Cuthandleoff
Cut the handles off of  your bags.

Cutdownsideofbag
Cut down the side of the bag and around the bottom...

Cutbottomoff
...so that you'll be left with a long strip and the bottom of the bag (which you can throw away).

Plainbag
Flip that long strip over and you've got a great surface for decorating!

STITCH IT

Cutcircles
Cut out a collection of fabric circles.

Stitching-close
Using the free motion foot on your machine, stitch around each fabric circle.

Closeup
To get to the next circle simply doodle with your sewing machine in a swirling line.

Stitched-finished
Your finished wrapping paper is ready to be wrapped around a gift!

Package-sm
Package-sm
You can see that I added one of the leaves from this tutorial to finish off the packaging.

PAINT IT

I'm the girl who can't stay away from paint, so here's a quick way to use a little bit of acrylic paint for some holiday cheer!

Tealstripes
Paint stripes (no points for neatness) with teal paint.

Redstripes
Add some red stripes.

Blackdoodling
Do a little bit of doodling with black paint.

Addwhite
Add a bit of gesso (the white paint doodles) and you're done!

Package-sm
Package-sm
I simply added a decorated tag to finish off my gift!

MIST IT

Placedoilies
Place several large doilies on your bag.

Mist
Mist over them using your favorite spray ink.  I used a combination of Adirondack Color Wash and home made Glimmer Mist.

Doiliesremoved
Remove the doilies to see your design.

Shine
Check out the shine from that home made Glimmer Mist!

Finished
I used acrylic paint to add a little note inside each of the doilies.

Package-sm
Package-sm
Here are all three of my packages together:

3packages-side-sm
3packages-side-sm
I hope you feel inspired to transform those brown paper bags into fabulous wrapping paper!

I love Julie’s tutorial, don’t you?  I’m inspired to go out and make some wrapping paper!!!