I decided to change things up a bit this week, and post a little something for our sewing crafty readers!
Sew Frugal & Fashionable is a relatively new blog dedicated to challenging its readers to shop smart by not traditionally shopping
AT ALL!
Based in DC, Sew Frugal & Fashionable teaches its readers how to:
- participate in clothing swaps
- how to shop for quality clothing at goodwills and swaps
- how to use sewing skills to create something fashionable
One of their
most recent tutorials showed readers how to sew a quick weekend bag. Looks pretty simple to do....who's gonna go for it?! Send us a picture so we can see!
~~~~~~~~~~~~~~~~~~~~~~~~~~~~~~~~~~~~~~~~~~
Last weekend I decided to take on three bag projects. Unfortunately with all the thrift store visiting I was only able to get around to one bag. In our upcoming sewing class in May attendees will have the option of completing one of three bags. This will be one of them.
To begin you will need to think about what you want to use your bag for. Are you trying to match with another piece of clothing? Are you going for utility? Do you want large or small? Perhaps you are using scraps of fabric and other add-ons to make more interesting. The choice is yours, just be sure to think it through before you get started. Remember at some point you will need to
sew through all thickness therefore be sure to choose your fabric wisely. Below you will find illustrated step by step directions for creating this bag. Should take about 2-3 hours from start to finish if you are a novice.
Happy sewing :-)
 |
| start off with 4 squares (ex 18x18) |
 |
| Fold all four squares in half to create triangles |
 |
| Insert a piece of interfacing for stability |
 |
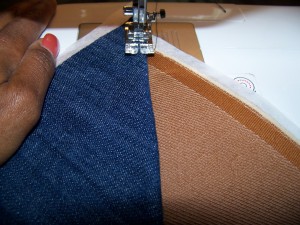
| Place the triangles on top of each other alternating colors |
 |
| Top stitch down the center to connect the triangles |
 |
| Place the sewn pieces on top of one another |
 |
| Stitch through all thickness. Do not pivot at corners. Instead sew all the way to the end of the fabric and back stitch |
 |
| Place corners together to create a triangle on the corner |
 |
| Stitch across the bottom to create the squared bottom |
 |
| Turn inside out |
 |
| Your bag should look something like this |
 |
Take note of the corners. Use and iron to press seams flat
|
 |
| Feel free to add a snap, button hole or any other embellishments |
 |
Now for the shoulder straps. Feel free to use pre-made straps to save time
|
 |
| Stitch pieces together |
 |
| turn inside out |
|
| Create the casing by folding the corners down |
 |
| feed the strap through the casing and adjust the length |
 |
| Finished Product |


1 comment:
VERY unique bag!!! I love it!
Post a Comment